(continued from Fastbook Setup Steps)
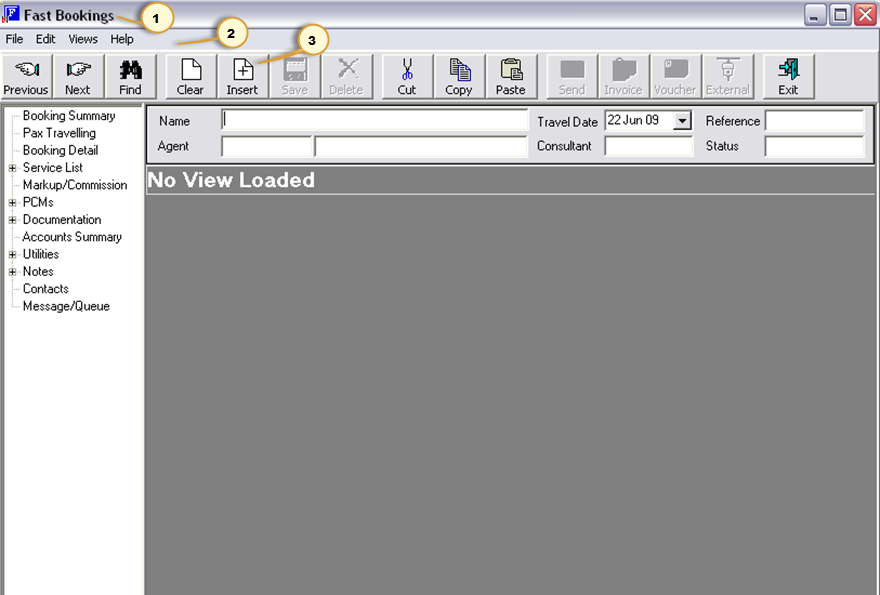
The screen shown below is designed to allow bookings to be added, recalled, changed or deleted. All aspects of the booking process – including messaging and document production - can be managed from this screen.
Screen Shot 4: FastBook Opening Screen – Overview 1
1. Title Bar
Displays the name of the current screen.
2. Menu
At the top left of the screen are four drop-down menus (File, Edit, Views & Help). All of the functions in these menus are more conveniently accessed via the Button Bar and Side Bar described below. The only exception is the Help function, which provides on-screen, context sensitive assistance and tips.
3. Button Bar
All the most commonly used functions are conveniently located on the large buttons across the top of this screen. Please note that these buttons are only activated when applicable to a screen within the booking process.
|
|
Holding the mouse pointer over each button will display the keyboard shortcut keys for that button. |
Previous (Ctrl-P)
Displays the previous booking alphanumerically by booking name.
Next (Ctrl-N)
Displays the next booking alphanumerically, by booking name.
|
|
If the cursor is placed in the ‘Reference’ field and Previous/Next clicked, then bookings are displayed in Booking Reference order. |
Find (Ctrl-F)
Displays a scrolling list of bookings sorted by booking name.
Clear (Ctrl-L)
Clears the currently displayed booking from the screen. Clear does not delete the record – it simply clears the details from the screen.
Insert (Ctrl-I)
This button is used to Insert a new booking, and while in bookings, to insert services into the booking.
Save (Ctrl-S)
Used to save changes made to an existing booking.
|
|
This button is only available when a booking record has been recalled. |
|
|
The save button does not have to be clicked after every entry – a prompt to save will be given when necessary. |
Delete (Ctrl-D)
The effect of this button will depend on what screen is being worked in within the booking. In the Service List Scroll, it will delete the currently highlighted service. In the Booking Header/Summary screen, clicking this will delete the entire booking. The booking delete function may not operate when the booking has live transactions or if the booking status does not permit deletion.
|
|
This button is only available when a booking record has been recalled. |
Cut/Copy/Paste (Ctrl-X, Ctrl-C, Ctrl-P)
Standard Windows functions for cutting, copying and pasting text. To use - hold down the left mouse button and drag to highlight the text to be copied. When the text is highlighted click the Cut or Copy buttons as required. To paste text – position the cursor at the insertion point and click the Paste button.
|
|
Cut/Copy/Paste will not work in all areas of Tourplan. It will work in individual text fields and document pages – e.g., Booking Name or Booking Reference fields or Supplier Messages etc, but it will not work in Cells or Grids. |
Send (No Shortcut Key)
Allows a message to be output to the Agent or one or more of the Suppliers for this booking. The message templates need to be setup in the Tourplan Messaging module before this function can be used.
Invoice (No Shortcut Key)
Allows creation of a booking invoice, which can then be printed, faxed or emailed it to the Agent. An “Invoice” type message template must be set up in the Tourplan Messaging module before this function can be used.
Voucher (No Shortcut Key)
Allows booking vouchers to be created which then be printed, faxed or emailed to Suppliers. A “Voucher” type message template must be set up in the Tourplan Messaging module before this function can be used.
Exit (Ctrl-E)
Press this button to exit the Fastbook module and return to the Tourplan main menu screen.
Screen Shot 5: FastBook Opening Screen – Overview 2
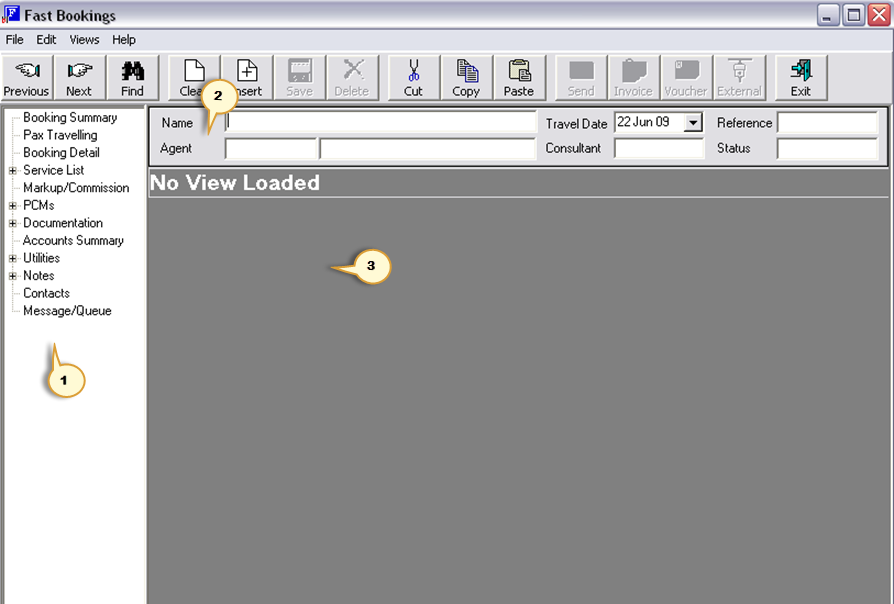
1. Side Bar/Tree Menu
Running down the left of the screen, the Side Bar/Tree Menu provides access to all of the sub-screens within the Fastbook module. The side bar is not activated until an existing booking has been selected (via the Header section of this screen).
2. Header
Located below the Button Bar, the Header area is used to display the Name (booking name), Travel Date, Reference (the booking reference generated by Tourplan for this booking), Agent, Consultant (the consultant whose name is attached to the booking) & Status (booking Status Code).
To recall a booking record:
3. Work Area
The majority of the screen, the Work Area is where all information regarding a booking is added, changed and displayed. These details will only appear once a booking has been selected.
(continued in Creating a New Booking)
 Tourplan iS V2.07 FastBook Training Guide
